Instructions for self-installation -setting up a satellite TV system will come in handy when there is no physical or financial opportunity to turn to professionals. Having familiarized with it, you can make sure that this procedure does not represent any complexity.
This process can be divided into 3 stages:
- Assembling the parts of a plate.
- Installation and adjustment of satellite dish. The search for a suitable installation site and a satellite, taking into account possible interference, is performed independently, as well as fixing the plate to the supporting structure.
- Connect the satellite tuner to the TV and antenna, adjust the search channel and fine-tune the dish based on signal strength.
It is not recommended to install the antenna on the roof, if absolutely necessary. If this can not be avoided, then before installation, consult a specialist.
Все системы должны быть надлежащим образом are grounded. Improper grounding can result in equipment damage and serious injury. Grounding can both the plate itself and the coaxial cable that connects the converter to the receiver inside the building.

Setting up a satellite dish yourself: preparation and procedure
Installation will require:
- use of tools;
- the presence of water pipes, wiring or gas lines near the installation site;
- use of a compass, protractor and building level;
- laying coaxial cable through walls and under the floor;
- use of stairs;
- knowledge of local grounding standards.
In the absence of experience in performing such tasks, the installation and setup of a satellite dish can not be performed on its own - one should seek the help of persons who have such experience.
You will also need these tools:
- cross and slotted screwdriver;
- hex key;
- electric drill and drills;
- building level;
- compass;
- protractor.
The following consumables are required:
- screws for fixing the antenna post;
- coaxial cable;
- grounding block and ground wire;
- cable fastening;
- An aerial socket;
- Silicone for sealing the holes for cable entry and holes for fixing the plate.
Helpful Tips
- The key points that accompany the installation and configuration of the satellite dish: do not drill any holes yourself, until the best place for placing the dish is determined.
- Перед тем как настроить тюнер спутниковой антенны on your own, you need to make sure that the installation of the plate is in accordance with local electrical and building codes and regulations, other laws and regulations. If there is no certainty, you should seek help from the architectural and construction inspection and energy surveillance.
- To facilitate periodic cleaning of snow, it is necessary to choose an easily accessible installation site.
- Make sure that there are no obstacles between the dish and the line of sight of the satellite. It should be remembered that the trees grow and can block the signal in the future.
- The maximum permissible length of the RG-6 cable connecting the receiver to the dish is 45 m.
- Using a cable of a lower (for example, RG-59) class can result in excessive signal loss and poor reception. The brand of the cable is indicated on its shell.

Place of installation
The antenna must be installed on a solidbasis. To prevent the dish from changing its position in windy weather, it is necessary to choose a place where it can be securely fixed before tuning the satellite dish. The mounting surface must be rigid and firm.
Important:The offset plate can be rotated within 70 °. If the antenna is mounted on a wall, it must be checked whether it can be deployed assembled in the desired direction. Otherwise, change the mounting location.
Do not install the antenna:
- on the railing or fence;
- on aluminum or vinyl siding;
- on the roof, if this is not absolutely necessary.
Assembling a satellite dish
Assemble the antenna parts according to the instructions foroperation. As a result, the attachment to the supporting structure, the reflector holder and the mirror itself with the bracket for mounting the converter or multi-feed must be ready.
Search for a satellite: tuning your antenna and tuner yourself
It is necessary to determine the orientation directiondishes. For example, if you plan to receive a signal from the Hot Bird satellite located at 13.0E, Astra 4A 4.9E and Amos 4.0W, the antenna should be routed to all three positions of the geostationary orbit.
For each satellite, it is necessary to determine the azimuth, elevation angle, or altitude of the satellite, and the angle of rotation of the linearly polarized converter.
Signal reception in areas with a seat angle of less than 12 °may not be possible. If you have access to a computer, the exact antenna settings can be found at www.dishpointer.com. You must enter the name of your settlement and select the satellite or multifid on which the dish is set.
For Moscow, the data is as follows:
Satellite | Hot Bird 13E | Astra 5E | Amos 4W | Multifid 13E, 5E, 4W |
Azimuth | 209.0 ° | 218.0 ° | 227.1 ° | 217.7 ° |
Elevation angle | 22.7 ° | 20.0 ° | 16.5 ° | 20,1 ° |
Angle of LNB | 15.8 ° | 20,2 ° | 24.3 ° | - |
Standing on the site of the future installation of the antenna, and exactlyholding the compass, slowly turn it, aligning the arrow with the direction to the north. A mark on the edge of the device corresponding to the azimuth of the satellite determined earlier, and will indicate the desired direction.
In order for the compass data to be accurate, it is necessary to avoid large metal objects. The accuracy of the measurements can be checked by conducting a test measurement a few meters from the previous one.
The angle of inclination of the satellite can be determined usingprotractor. Also, you need to make sure there are no obstacles. If there is no line of sight of the satellite, another place should be chosen for the antenna. It is not superfluous to be convinced and in the absence of plants, which in the future can close a direct review.
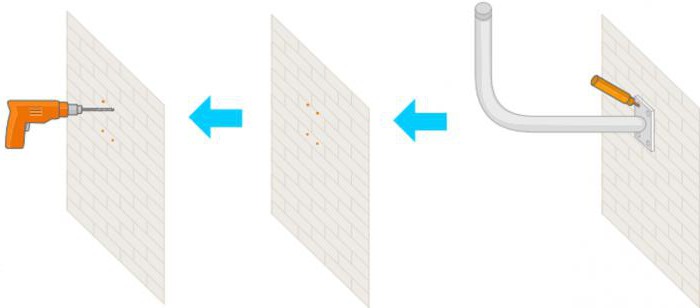
Mounting the dish
Before drilling the mounting holes withbuilding level, before checking the tuner of the satellite dish yourself, the vertical orientation of the bracket is checked. If the bracket is set obliquely, then further actions lose meaning.
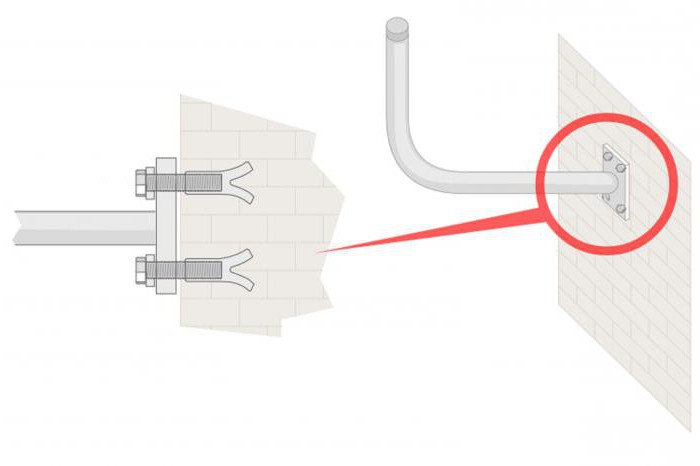
- В конструкции, на которую монтируется антенна, it is necessary to drill holes corresponding to the mounting holes of the bracket. Secure the bracket with the anchor bolts. Check the connection for mobility.
- Attach the mirror plate mount by loosening the azimuth bolt and the seat angle bolt. Tighten the angle adjustment bolt so that the fastener can be held on the bracket.
- Loosen the seat angle bolt 1/3 turn. It is necessary to adjust the tilt angle according to satellite data and tighten the bolt.
- Install the converter bracket and secure it securely.
- Using the compass, send the LNB in the direction,corresponding to the azimuth of the satellite. Draw a vertical mark on the antenna mount and bracket. It will indicate the approximate direction to the satellite when tuning.
- Loosen the angle adjustment bolt LNB. Tilt the dish mirror to the desired angle and secure it securely. In the future, there is no need to make any adjustments to this parameter.
Receiver connection
To be able to observe the signal levelto increase it to the maximum value, you need one of the converters and the TV to connect to the receiver. Preparation of the receiver's satellite tuner for connection is carried out in accordance with its instructions.
Connect the RG-6 coaxial cable to one of theoutputs LNB. Connect the other end of the coaxial cable to the input connector of the receiver. In order to make it easier to set up the dish, it is recommended to temporarily connect the receiver and the TV near the place of its installation. If monitoring of the signal level on the TV screen from there is impossible, then the tuning and installation of the satellite dish and the tuner can not be performed independently. This will require an assistant who will monitor the readings on the TV.
To receive a signal, you need to configuresatellite tuner receiver to an open-access channel. For example, to receive from an Astra 5E satellite (formerly Sirius), you should select the 11766H, 12073H or 12245V transponder, Hot Bird 13E - 10971H, 11766H or 12207H, Amos 4W - 10722H, 10759H. Information on how to add the desired channel to the satellite tuner is contained in the user manual of the specific receiver model.
Start the setup menu in the receiver.The program window will display its current level on a scale graded from its absence to the largest value. The goal is to maximize the signal.
Check the connection between the satellitereceiver and LNB. The way of indication depends on the satellite receiver. Some devices indicate the presence of the connection in green, and the absence - in red.

Setting the dish to a signal
Set up satellite TV yourselfIt is made at a direct visibility of the screen of the TV, and with the assistant controlling the signal strength, - in the absence of the possibility of connecting the equipment near the antenna. If you are using a search appliance, you should go to the appropriate section.
You will need data about the azimuth, elevation and inclination of the convector, defined earlier.
- Ensure that the settings of the dish match the calculated data.
- Place an identification mark on the connection between the bracket and the antenna mount before making any adjustments.
- Standing behind the plate, with both hands take it from two sides and turn as far as possible to the west. Then slowly move the antenna to the east, while the assistant observes the tuner's tuning screen on the TV.
- When a signal appears, make a second mark.
- If the maximum power point is passed, then turn the antenna in the reverse direction until the maximum signal is reached.
- Tighten the screws securing the plate.
- Now, to further improve the signal power, you need to correct the satellite's tilt angle. After this you can tighten all the bolts securely.

Alternative setting method
- Locate satellites can be using a special device - an antenna signal indicator.
- To do this, connect a short coaxial cable from the converter to the LNB-connector of the indicator, and a cable from the receiver to its second connector.
- Tune in to the working channel of the satellite.
- Orient the antenna to the azimuth and elevation angle, calculated earlier.
- Move the dish to the right of the reference mark.
- Slowly rotating the mirror back to the mark,listen to the change in pitch of the beep indicator. If the tilt angle is set correctly, pitch changes will be heard. A weak sound may indicate a signal from another satellite. It is necessary to find the position of the maximum indicator reading.
- Repeat the procedure, changing the elevation angle.
- After completing the setup, disable the search indicator and connect the tuner directly to the converter. Check signal strength with receiver firmware.

Coax cable grounding
The kit for self-installation includes the unit and the ground wire.
Before you tune the satellite tunerantennas are independently earthed external cable, which can be subjected to static discharges or contact with the wiring. For this, a special block is used, placed as close as possible to the entry point.
Attach a ground block to the wall near the antenna. Connect to it the cable from the dish and the receiver.
Connect the wire to the connector block. Tighten the screw. Connect the wire to the building ground or another suitable point.
Troubleshooting
If you have problems finding a satellite signal, you should take the following actions:
- make sure that the cable is connected to the SAT IN port of the satellite TV receiver;
- make sure the channel settings are correct. If everything is correct, then enter the data of another transponder;
- make sure the cable is connected securely and re-confirm the azimuth, elevation and tilt of the converter for your location. Direct section of the bracket to check for a plumb;
- repeat the satellite search, reducing or increasing the elevation angle by 1 ° from the initial setting.
DiSEqC connection and channel scanning
If the number of converters is more than one, then after setting up the satellites, you should connect DiSEqC. For example, input A is Hot Bird 13E, input B is Astra 5E, input C is Amos 4W.
The switch is installed near the antenna and is placed in a waterproof container, in the bottom of which ventilation holes should be made.
It shows the inputs for connecting the heads.It is necessary to record their correspondence to each converter so that in the tuner menu for each satellite head, in accordance with the connection, set DiSEqC. The sequence does not matter. It is sufficient to match a specific connection to the installation of the receiver. If the DiSEqC position is selected correctly, a signal should appear.
This completes the installation and setup of the satellite dish.