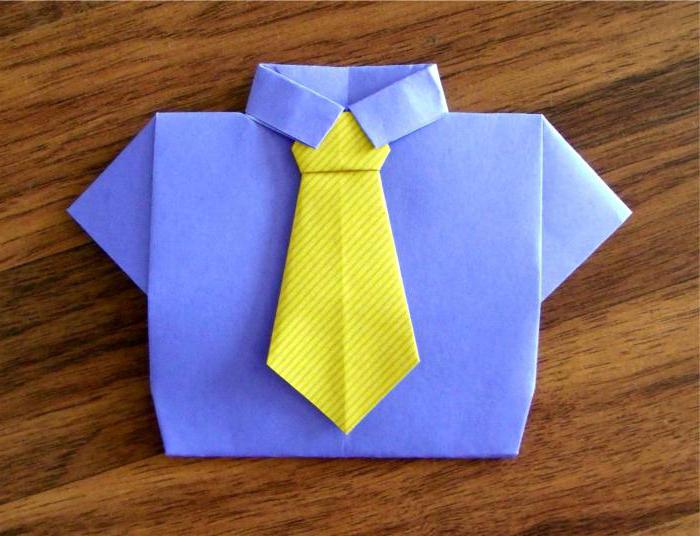
A gift made by yourself - what can beit is better? In particular, such surprises are pleasing to the closest and dearest people. A paper origami tie with a fancy tiny shirt will be a great gift for Father's Day or for the birthday of a brother or grandfather. This sign of attention can be an independent souvenir, as well as a cute postcard or container for a cash or sweet prize.
Necessary materials
Cute origami tie with a shirt cangive about and without. There is a mass of men's holidays, where this work will be useful: February 23, Builder's Day, Father's Day, Railwayman's Day, and so on, not to mention numerous birthdays, anniversaries and other anniversaries. To create this awesome thing you need only 2 pieces of paper and just a little bit of time.
You just need to follow the instructions, step by step,and you will be in the hands of a unique and original gift. A shirt needs a sheet of paper (8.5 cm x 11 cm), and a tie needs a square sheet of paper (5 cm x 5 cm). The sizes are approximate, depending on the dimensions of the crafts, they can be varied, but without disturbing the aspect ratio.
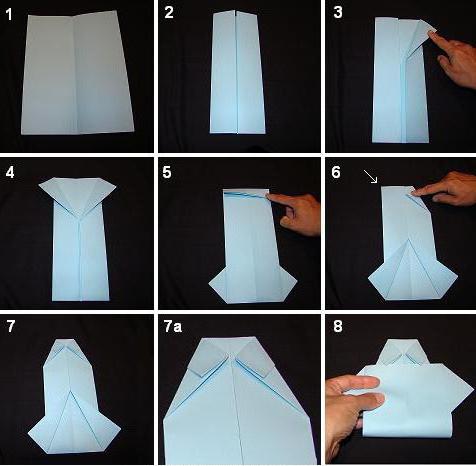
Making a shirt:
- Step 1: Take a piece of paper and fold it in half, carefully ironing the crease. Then scan back.
Step 2: Fold the left and right edges of the paper toward the center fold to create two flaps.
- Step 3: Take the upper inner edge of each flap and fold it outward, creating a semblance of the English letter “V”. These will be sleeves.
- Step 4: Turn the paper on another groan as well as vertically.
- Step 5: Take the top edge of the paper and fold it down about 2-2.5 cm. This is the first part of the collar.
- Step 6: Turn the project over to the other side. Take the top left and right corners and fold them so that they meet in the center. Now you have a collar.
- Step 7: The shirt is almost ready, it remains to bend the bottom edge of the paper (with the letter “V”) to the top.
- Step 8: It remains to neatly fill the bottom edge directly under the collar. It's done, now you have a miniature origami shirt! If you do not make a V-shaped fold, then the shirt will turn out without sleeves.

It's time for a tie
To complete the crafts, add an elegant tie made of paper (origami). How to make it? Follow the instructions.

- To make an origami tie, take a square sheet of paper and fold it in half to get a diagonal crease.
- Take the two opposite corners and turn them in this way towards the center to form a triangle.

- Then flip the sheet to the other side.
- Fold the top corner almost to the middle of the whole figure.

- Now we bend the tip of the top of the folded corner up a certain distance (in the figure this is indicated by a dotted line).

- A shape resembling tractium, folding up the dotted line. This is a tie knot. By bending its sides, you can make it square. Whom like more.

- We arrange the lower corners of the trapezium at the top of the figure.
- Turn the sheet to the other side.

- Take the outer sides and fold them towards the center crease.
- Turn the design over to the other side.

- Now you have a cute origami tie. Adding some decorations in the form of buttons, stickers, drawings or applications will not be superfluous.