During the change of seasons it can be quite difficultto anticipate in advance the whims of changeable weather. Frost in the morning and heat in the afternoon - this pattern is typical for late autumn, and for the spring months. The optimal way to protect your palms from the cold, avoiding uncomfortable mittens and gloves, is the use of an accessory, such as mitts (crochet). For beginners this product may seem complicated, but there are ways to simplify the work.
What are mittens
This accessory has recently entereduse. And immediately received the widest application. Mittens look like mittens, leaving all the fingers open and warming only the back and the inside of the palms.

There are several ways in whichYou can make crocheted mitts. The knitting pattern of a particular product is a very rare and individual thing. It is developed by each knitter herself. Rather, you can find patterns of patterns that are suitable for knitting such items.

How can you connect the mittens with your own hands?
Mitki can be made in two ways:
- Doing the addition for the thumb.
- No additions (simplified model).
The use of the second method is justified, if necessaryconnected warm and soft crochet hooks. The pattern of knitting such patterns, as a rule, includes openwork elements. At their expense, the canvas can stretch out slightly and tighten around the palm of your hand. Ornaments with small longitudinal rapports fit well. Such patterns facilitate the calculation of the future product and its implementation. The first species of mittens has a shape more appropriate to the palm of a person. This method should be used when working with a thread that does not stretch. For example, the method is topical for cotton, linen and viscose.

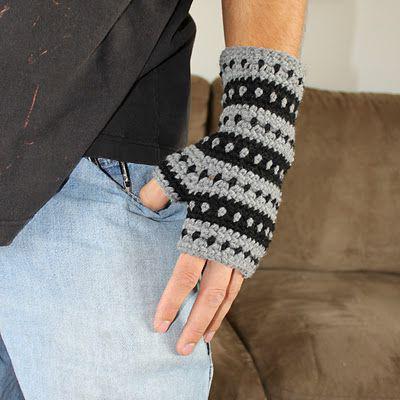
Crochet: fingerless mitts
You can make mittens that provideExpansion of the canvas from the wrist to the thumb. Interesting choice of colors of yarn and pattern makes the model relevant for both women and men. The principle of manufacturing such mitts is the sequence of actions:
- Making a control sample and calculating the number of columns for the product.
- Set of initial chain of air loops. You can knit in different directions: from the wrist to the fingers or vice versa. In this example, you will describe how to tie crochets from the fingers down.
- The work should be carried out in a circle, making sure that the rows are neatly joined together. From the beginning of knitting to the base of the thumb, the canvas knits smoothly.
- Then for the big finger it is necessary to execute a chain from several air loops (about 10), to pass 3-5 loops of the basis and to fasten the next column.
- Further work also takes place in a circle withregular fitting. This is necessary in order to determine how many columns it will take to reduce. Often, it is enough to reduce one in each row. Abbreviations are performed exactly in the center of the thumb. However, a very popular option is to remove two columns in each row or one after the other. The lines of contraction pass along the edges of the expanding section (they converge to one point closer to the wrist line).
At the final stage, the thumb is tied in several rows to a height of about 2 cm.
Simple mitts for beginners: getting started
The following description tells how to quickly connect the original crochet hooks. The knitting pattern is not needed here, since verbal instructions better convey the essence of the master class:
- First of all you need to test yarn and patternin combat conditions: make a control sample. In doing so, you should tie a section of the canvas and a continuous pattern for the cuff (columns without a crochet), and the main ornament (lush columns).
- Изготовление манжеты заключается в вязании a rectangle with loops on one side. Its length should be sufficient to turn around the wrist, plus a 4-5 cm pad for fastening. The cuff height is usually about 7 cm.
- Loops for buttons are very simple: instead of one of the columns without a crochet, an air loop should be connected. Then, skip one loop of the base, and from the next, remove the next bar.
- Расстояние от последнего ряда манжеты до The thumb holes are determined by fitting. This area is knitted in circular rows with a basic pattern: repeat successively a magnificent column and two air loops. You can alternate lush bricks with one air loop to get denser crochet hooks.
The knitting pattern of this pattern is not visually verydiffers, but the azhur turns out to be smaller. Go to the main picture follows, putting the edges of the cuffs on each other as they will look in the finished product.

Forming a thumb and completing knitting
To form a hole for the thumb,you should perform lifting loops, then knit the series with the basic pattern. It must be left unfinished. At a distance of one magnificent column to the end, the canvas is turned and knit in the opposite direction. The height of the hole for the finger is two rows. In the process of knitting the third one, you should resume the circular rows. To do this, at the end of the second, you need to transfer the chain from the air loops through the upper part of the hole. Further fabric knit exactly.
The final steps are the execution of the strappingthe upper edge of the mittens, cuffs and finger holes. You should also pick up and sew on the buttons. That's ready mitts in any weather. If desired, you can use another pattern as the main one.