Any creativity brings only positiveemotions and great benefits. Someone masters the basics of knitting or embroidery, someone tries to sculpt or draw. Each person finds a lesson to his liking, and very often it develops into a profession or a favorite hobby.
In this article we will talk about how to drawpear. Perhaps, it will seem like an easy task to someone, but it’s not so easy to make this fruit realistic. Try to draw not from the head or from the picture, but from nature. This is a very exciting process.
Let's take a look at how to draw a pear in stages.
Stage 1. Choose the nature for the picture
When choosing a pear for your design, tryfind a perfectly smooth fruit, let it be a little “hunchbacked”. This will make it harder for you to learn how to draw a pear, but it will give your work a personality.
Stage 2. Sketch pear
Set a beautiful, juicy pear in front of you.just do not eat it until after work. In order to make it easier to understand where to start drawing, break the pear into separate forms. First draw a circle, this will be the bottom of the fruit. Try to make this circle the same size as the bottom of the pear. This way your eye is trained. You can draw a vertical center line from which you will build. Draw the top half in a convenient way for you.

See if the top of the pear is tiltedperhaps, she looks a little to the side, as the stem is located relative to the central axis. Move away from the picture and look from the side, if necessary, correct the contour. Eraser erase all auxiliary lines.
Step 3. Go to color.
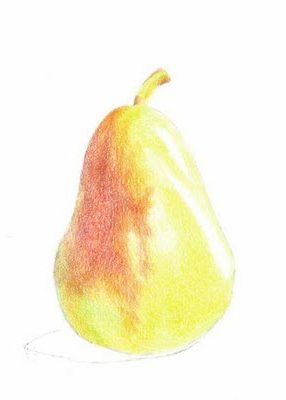
Here we will not only look at how to drawpear pencil, but also try to make it realistic. We will do this with colored pencils. If you like to experiment with materials, try pastels or crayons.

In our case, the pear is yellow-red, and beginimpose color we will be in yellow pencil. Before you start work, pay attention to those places where the light falls. These are highlights, it is better not to paint them. They can be lightly marked with a pencil for your convenience. Alternatively, at the end of the work such reflections can be made an eraser. But not always gum can erase colored pencils quite well.

First, carefully walk in yellow, making a light background. Then, with more intense pressure, paint in the shadows. Connect other colors. Simulate the volume of the pear.
Stage 4. Shadows
To make your pear more “alive”you need to make accents. You should already have glare, it remains to make a few strokes in a darker color, for example, brown. Draw a cutting, on the pear itself make it darker where it comes into contact with the surface on which it stands. And, of course, do not forget to draw a shadow that will fall from it.

That's it, now you know how to drawpear so that she had a realistic look. If you coped with the work easily, try to depict the background around it, and next time complicate the task, draw a cut pear.