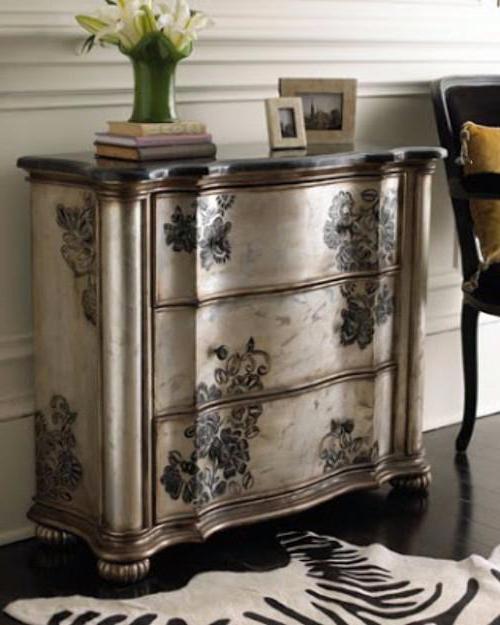
In the postwar years, when Europe tried toforces forget about the horrors experienced, its inhabitants enthusiastically embraced the minimalist style in the interior. He suggested parting with grandmothers dressers, cupboards, wardrobes and other old bulky furniture. However, after several decades, the same interiors are fed up with everything. In the early 80s, the Englishwoman Rachel Ashewell made a real revolution, and she became a frequent visitor to junk dealers and flea markets. She bought various little things and furniture from them for a penny, and then restored and decorated them, including using decoupage technique. Her works began to be in great demand, and the style invented by Mrs. Ashewell, which is based on artificial aging, was called chebbi-chic.
More recently, it has gained great popularity andin Russia. In our country, in such a style, not only interiors, but also hand-made gifts, and even wedding tables and banquet halls. Many are crazy about furnishings with Chebbi-chic decor. They will certainly be interested to learn how to make a decoupage chest with their own hands at home.
Features of technology
The name of the decoupage technique comes fromFrench word meaning cut out. It involves the decoration of objects with pictures of paper or fabric. Carved fragments beautifully placed on a specially prepared surface, and then poured varnish.
What will be required
The decoupage of the dresser (the photo of some options, see below) can be done by everyone, since this does not require special skills. You will need:
- old small chest of drawers with drawers;
- ivory and black paint;
- brushes of various thickness;
- stain;
- grinding skins of various grains;
- black paint;
- wax candle;
- stencil with angular ornamental pattern;
- Scotch;
- palette knife (a special tool for applying paint);
- embossed acrylic paste;
- mordan (adhesive mixture on varnish);
- napkins with a pattern;
- varnish;
- special decoupage glue;
- heal (very thin metallic foil of silver or gold color);
- bristly stiff brush;
- chest of drawers;
- fasteners.
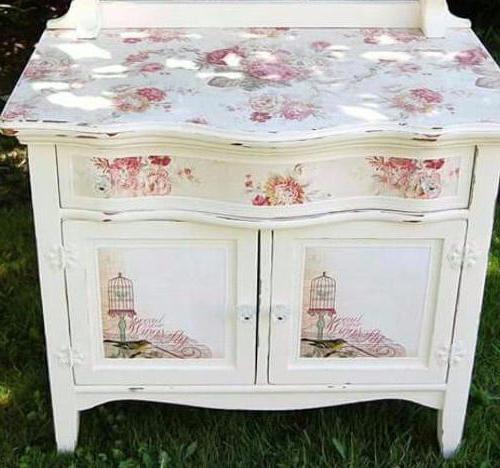
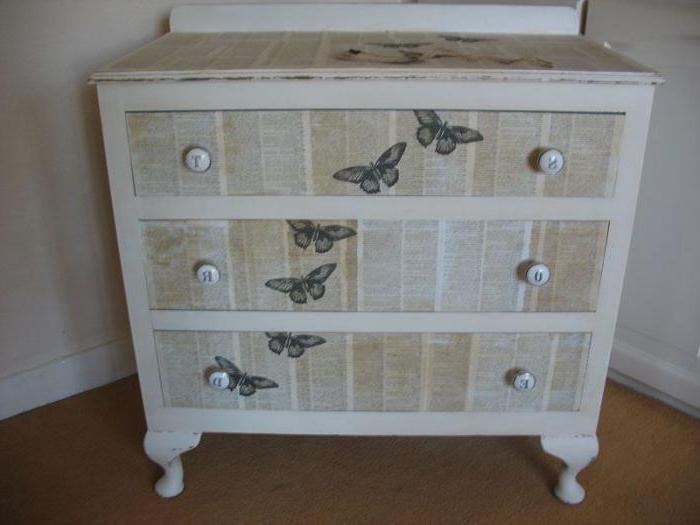
Chebbi-chic dresser creation master class
Изготовить такой предмет интерьера из старой furniture is simple enough. If there is at least a minimum skill of decoupage, you can get to work. However, first the chest must be aged artificially. At the same time, real defects that appeared on its surfaces during long years of use and storage, for example, in the attic, will also be hidden. So, before you make a decoupage chest, you should:
- paint it inside with paint, for example, ivory;
- apply a dark stain on top using a dry brush technique, so that imitation of scuffs is obtained;
- make a dresser primer outside;
- oshkurit;
- paint black places where they are going to make scuffs;
- rub the candle dark places;
- paint the whole dresser in the main color;
- apply paint in 4-5 layers;
- wait until dry.

Relief patterning
To make the future decoupage of the dresser with your own hands look even more stylish, you can add it. To do this, create a relief pattern. The order of work is as follows:
- choose a stencil;
- put on the surface of the chest;
- they are attached with scotch pieces, fixing in such a way that the stencil remains stationary during operation;
- a couple of drops of varnish are added to the acrylic relief paste to make the pattern stronger when dry;
- put it in an even smooth layer over the stencil;
- wait a minute;
- gently remove the stencil;
- after five minutes, fingers are patted on the pattern so that the relief is slightly smoothed out;
- in the same way decorate a dresser from all directions;
- wait until the paste is completely dry (about 12 hours);
- carefully sand the pattern, trying not to overdo it;
- Peeling off white paint and wax using a palette knife.

Chest decoupage
For decoration is very important pattern. Often used napkins. The necessary fragments with a pattern are cut out of them and the uppermost colored layer is carefully separated.
Further:
- cut out the necessary elements;
- stick on the surface of the chest with a brush;
- put mordan on the pattern;
- allowed to dry for half an hour;
- put potal, smoothing brush;
- remove the excess with a hard brush (in those areas where there was no mordan, the potal does not stick, so its surpluses are easily swept away);
- in order to refine the pattern on the napkin, the sandpaper carefully processes the borders of the motive so that it becomes thinner to a minimum;
- they paint over them, connecting with the main surface of the dresser with the paint of the primary color, carefully applying it with a thin brush.
Patinating and mounting accessories
Chebby-chic chest decoupage can be supplemented with details with the effect of erased gilding. To create it using patinated. They gently rub over the relief pattern on the surface of the dresser.
Mounted on the drawers handles made of metal. It is better to choose the options made in vintage style, using screws, washers and screws.
If you wish, you can pre-onin places where handles should be fixed, make a stencil with a relief pattern of special paste, as described above, leaving space for holes. It should also be covered with a patina to maintain the overall style of the dresser.
Covering boxes: what is required
To make the chest decoupage from the inside, it is best to use the same motif (picture on a napkin) as on the drawers. It should be transferred to the fabric for coating internal surfaces.
This will require:
- the same napkins, which were used during the decoupage on the external surfaces of the dresser;
- cardboard;
- Moment Crystal;
- fabric (canvas);
- special glue for decoupage on the fabric;
- iron;
- scissors.
Work order
Decoupage old chest of drawers from the inside (on the bottoms of the drawers) produced as follows:
- cut from durable cardboard rectangle with such dimensions as the bottom of the box;
- on it measure the fabric;
- cut four rectangles;
- a motif is pulled from the napkin;
- put glue for decoupage on the fabric;
- impose a motive;
- press, quickly smoothing fingers;
- dried for 24 hours, hanging the fabric on the dryer with the help of clothespins so as not to damage the pattern;
- then ironed with a hot iron on both sides, setting the mode "Cotton";
- obtyagyvayut the bottom of each of the boxes with a cloth with a decoupage pattern;
- cover in 4-5 layers with 100% matte varnish.

Decoupage chests decorate the room in styleshabby chic. The variant, the master class for the manufacture of which is presented above, is also suitable for placement in Provence or Country style, if used as the main decoration and combined with more modest pieces of furniture without gilding and noticeable decor.