Квиллинг — это замечательное искусство paper trick that makes many people admire. Thanks to this art, you can learn how to make different panels, animals, plants and more. 2014 is the year of the Horse, so it will be interesting to try twisting your little horse out of paper. Quilling is a simple job, so if you have the desire and patience, then you should definitely try your hand. Do not forget to properly and thoroughly prepare for it. The horse in the technique of quilling is a fairly easy task that even children can handle. The most important thing is practice. The more you practice, the better and more beautiful it will be.

Preparation for work
For work we should prepare:
- Paper stripes with a width of 3 mm, length - 27 cm. Colors: blue, dark blue, gray and gray-blue.
- One paper strip with a width of three cm, blue or dark blue.
- Background paper (the color can be chosen independently, but it is necessary that it must be in harmony with the future horse).
- Prepare from tools: a thin awl, small scissors, PVA glue, miniature tweezers with elongated ends, as well as a heat gun.
- The frame size is twenty to twenty cm. The base must be cardboard and have a size of 17 by 17. In addition, the mat must be rounded and have a diameter of 13-14 cm.
Getting started
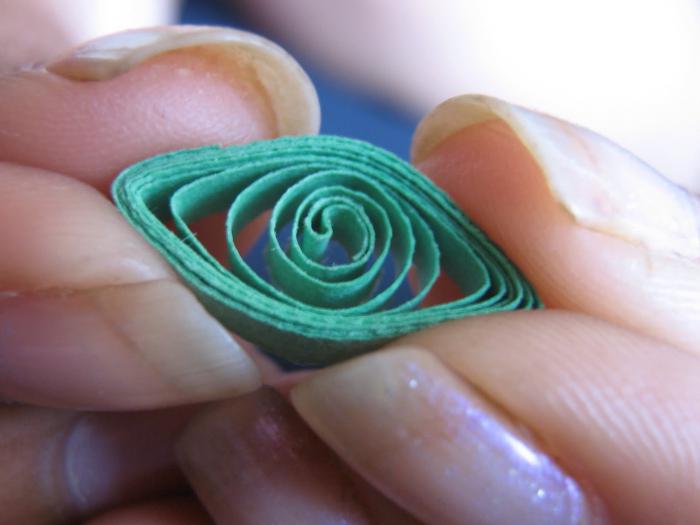
Первый этап заключается в том, что нужно make twigs, leaves, and also - most importantly - poinsettia flowers. To create a blue flower, take sixteen whole stripes and twist them in the shape of "eyes". Next, try to give the resulting shape the shape of the English letter S. Using a thermogun, glue eight petals together in one tier. Repeat the same steps with the following petal. After that, connect the 2 tiers with a small displacement of the petals and glue them. Glue to the middle of a thick roll of one third stripes of blue.
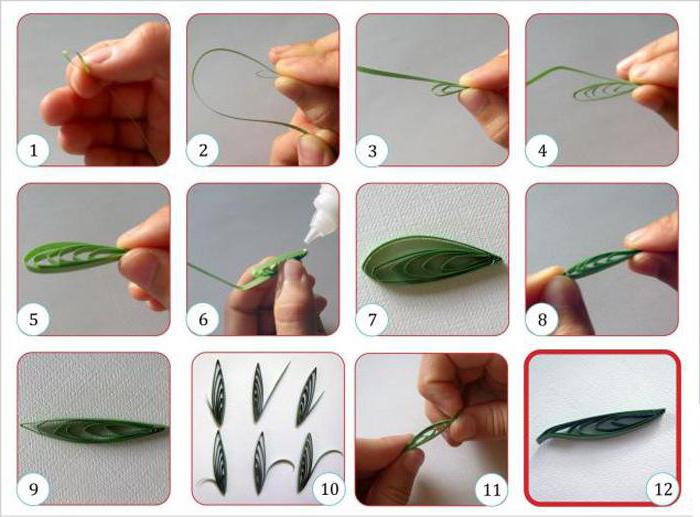
Now you need to take the leaves.We cut them out of stripes with a width of three cm. To make it symmetrically, we first fold the paper in half and draw a neat outline on it, “by eye”. After that, carefully cut out a half-sheet. Using tweezers, we create small streaks from the edge to the fold line of the leaflet. And now you can open the blank - a beautiful leaf is ready! Ten beautiful leaves will be enough. Do not forget to make a variety of them - each piece should be a different size.
Master twigs
To make twigs, you need to twist outeight whole strips of leaves. They should be blue or dark blue and resemble the shape of a "droplet". Then gently squeeze them along the edge of the contour to make the shape of a “goose foot”. Next, we glue them in two layers, wrapping in blue or gray.
Remember that on one branch should go five sheets, and on the second - only three. You can change this option by adding your own great idea.
Art quilling: horse - master class
Чтобы сделать милую лошадку, можно применить свою fantasy. The interest forums also present some panel design ideas. In fact, there is no limit to fantasy. Today the quilling technique is very popular, horse schemes can be found in many sources. You will be presented with a variety of panel options and much more.
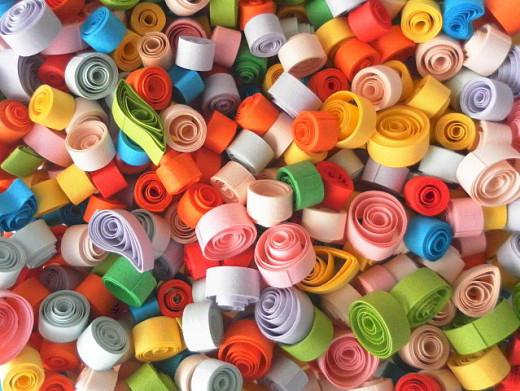
To begin, take 50-80 pieces of stripeslight gray and wind the various elements used in quilling - these are “eyes”, “drop”, “triangles”, “crescents”. To create a beautiful picture, you need to make these elements of different sizes. Now we are starting to fill in the “inside” - gently glue the elements together with each other “backs” or “sides” with the help of PVA glue. If you follow the pattern, then make the figures more flexible and voluminous. This will help create the effect of a 3D volumetric image.
What face will have a horse? Quilling embodies ideas
Now we make a face for a horse.Making eyes - for this cut out of dark paper a small circle or tightly twist one strip of paper. It remains only to stick it in the right place. For a change, you can even add eyelashes, cutting the paper into three or five mm small strips. If you add two ears, you get a real horse. Quilling provides plenty of opportunities for creativity. When creating the ears, choose the color of the horse's color and wrap it with a dark stripe in two or three layers. The front part of the muzzle is made by twisting two strips with a four to five mm bend and forcing. Thus, it turns out not just a roll, but an ellipsoid. It should stick on the lips and nostrils, cut out of paper in the same way as the eyes.

With a tail prepared in advance will lookbrighter and more original is our horse. Quilling will help to organize this difficult matter. First, it is recommended to cut a wide strip with a fringe, about three cm. Leave one end uncut - you will need to twist it gently into a roll. Do not forget to fluff the hanging tips and glue them to the right place.
The time has come to create a colorful mane.Have patience and wind about 80-90 pieces of strips of gray-blue or just blue. The shape should match the "eye" and be as strong as possible. Do not forget to shape the letter S. The finished mane needs to be glued from the top of the head to the back.
Assembly horses
First choose a background that blends in with the color.horses. Then we “try on” the parts of the horse that you made, as well as additional flowers (not sticking, but applying). If everything suits you, then you can begin to glue. There will be a huge variety of options - try experimenting and don't be afraid of your own ideas.