Christmas tree, crocheted, can be a decorationNew Year tree, decor for a festive table or a cute souvenir for a friend. The variants of making knitted Christmas trees proposed in this article are very simple to implement. These recipes will be useful for newcomers, as well as for those who bring up young children. After all, many children like creative art.
How to tie a Christmas tree: the easiest way
This method of knitting a Christmas tree can be applied even in cases when the master does not own the crochet at all or has just started training.

In the first case, she can use anytape or tape at your discretion. In the second - you need to connect a long chain of air loops (VP). Before you tie a New Year tree with a crochet, think about the yarn and the hook. The thread is better to choose thin and dense, even rigid. For example, cotton or linen. A hook should be small in size (optimally 0.9-1.2).
The length of the initial chain can be calculated,determining the width of the future tree and multiplying this number by eight. The width of the crocheted tape should not be more than 2 cm. You can bind several rows of columns without a crochet (RLS) or with a crochet (CAP).
The recipe for how to tie a Christmas tree forbeginners, includes the assembly of the product. The tape should be laid out on a flat surface, forming all the bends, and thread each layer on the thread. Between the layers can be placed simple or tied beads or other appropriate decor.
Knitting a flat Christmas tree
The next most difficult way to tie a tree with a crochet is to make a flat triangular Christmas tree.

To do this, almost any schemetriangular motif. It is better, that it was moderately openwork, otherwise in the finished knitted product the silhouette of the tree will be hard to guess. The photo below offers several schemes that can be used for work.

Ready products for stiffening should be impregnated with a solution of gelatin, sugar, starch or PVA glue.
A cone-shaped Christmas tree crocheted: a master class
The tree, the basis for which the cone serves, is the most universal. It can be performed in almost any color, decorate at your own discretion and apply literally everywhere.
Before you tie a crochet tree, you shouldto think over its filling. It can be a sintepon, cotton wool or cardboard cone. If it was decided to stop on the last option, then it should be prepared in advance. The size of the finished cone should be guided during operation. So, when you have all the necessary materials (yarn, hook, scissors, cone or padding, decor), you can start knitting the Christmas tree:
- Begin with knitting the bottom. To do this, they recruit 4 VP, close them in a ring and bind 6SBN into it.
- In each successive series, it is necessary to increasethe number of RLSs at 6. Additions are best done not one on top of the other, but a little obliquely, otherwise it will not be a circle, but a hexagon. When the width of the circle is equal to the size of the bottom of the tree (often enough about 7 rows), it's time to move to knitting a cone-shaped base.
- As a boundary between the two parts, you need to knit a series of RLS without adding, while tying all the RLSs behind the back of the hinges of the previous row.
- Next, you should perform a uniform reduction of the blade at 6 sc in each fifth row.
- Having roughly half the Christmas tree, you need to insert a cardboard cone inside. If a sintepon or cotton wool is selected as the filling, then they should be placed in the tree, when it will be bound to 2/3.
- The last third of the tree leaf should be cut to 6 CBN in each row.
That's the basis for decorating. It is very important to get a pointed top of the tree. This is possible if, after all RLS are reduced, execute several VIs and only then hide the thread.
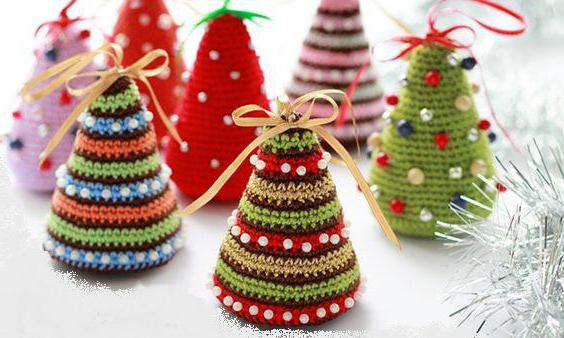
Methods for decorating a cone-shaped tree: color strips
The described algorithm of how to tie a treecrochet, for beginners can serve for the manufacture of an independent product or the basis for placing decor. The photo below suggests a method in which a Christmas tree-cone is connected by multi-colored threads and decorated with a minimum number of beads.
Knitting Christmas trees with sprigs
The next way how to tie a Christmas tree crocheted,is to impose stylized branches on a cone-shaped base. To do this, you need to knit a pico of several EPs along each row sequentially. This is not difficult, because all the circular rows from which the Christmas tree is formed are spiral. They have a common beginning and an end. To begin to knit a pico is better from below, so it will be clearly visible, that it turns out and whether it is necessary to shorten "branches" closer to the top.
The size of the pico branches will need to be selected independently, since the characteristics of the yarn are very influenced by their length and volume. The photo shows how you can transform the Christmas tree-base by imposing a pico.

An interesting feature of this particular designis the production of a trunk and a flat, stable foundation for a Christmas tree. Inside the trunk, it is better to place a cardboard rolled up in a tube or thick paper, and for a flat base any disc of suitable size will fit.
Another way to knit a lush tree is to crochet the imposition of a conical base of semicircular elements.

Each of them consists of several CLOs with a common ground. Knitting is done spirally, as in the pico method.


