Connecting the outlet to the electrical wiring is notwill be difficult if you have an elementary understanding of the principle of the power system and remember the rules of safety during work. In addition, the quality of the work done is also of particular importance, because incorrect connection of the outlet will lead to malfunctions and breakdown of electrical appliances, and the outlet itself may be damaged. But, one way or another, periodically you have to repair various connections in the electrical network, and therefore it is worth to learn how to properly connect the outlet.
Tool for work
Before starting the installation work, the following tool must be prepared:
- Construction level.
- Nippers.
- Punch.
- Insulating tape.
- Pencil.
- Screwdriver.
Socket Outlet
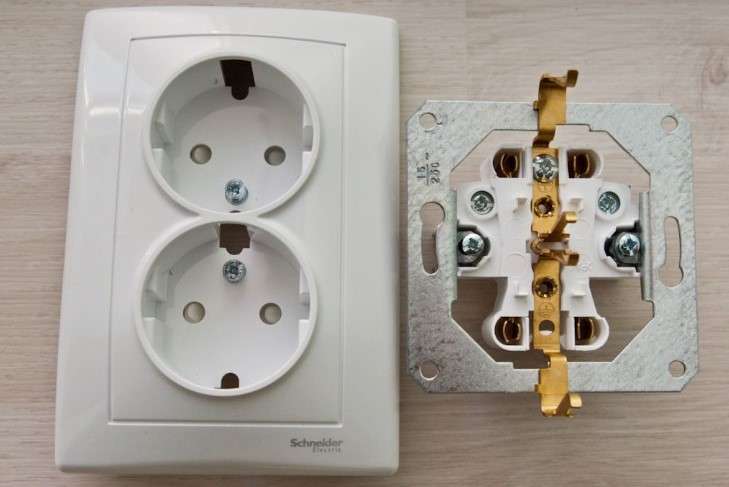
Before connecting the outlet to the power supply,it is necessary to understand its structure. The socket consists of a shoe assembly that has a front decorative panel and a frame attached to the shoe with a screw. The back has contacts for the plug, which is inserted into the back box. It is used if the wall outlet is attached to the wall. When the wiring is laid on the surface, wall outlets are connected. In general, the outlet consists of:
- Shells.
- There are two contacts in which the appliance plug is turned on. One contact is phase, the other is zero.
- Two terminals, through which the contacts are connected to the mains.
- Contact for ground connection (not available in all outlets).
- Movable feet for attaching the outlet.

After the outlet is clear, you can begin to understand how to connect the outlet to the power supply.
Connecting the electrical cable to the outlet
A standard socket is designed to connect the cablewith a cross section of up to 2.5 mm. This kind of wiring is often used in apartments of multi-storey houses. Differences in the thickness of the cable can touch the points of connection of the lighting fixtures. In this regard, in places for connecting chandeliers or sconces, as well as switches, a cable with a section of 1.5 mm is often laid.

Now step by step we will understand in the rules how to connect the socket:
- First turn off the electricity supply to theroom where the work will be carried out. It does not hurt, and after switching off the automatics, check the absence of voltage by a special device - after all, the automata can also fail. Double control will help to avoid serious consequences.
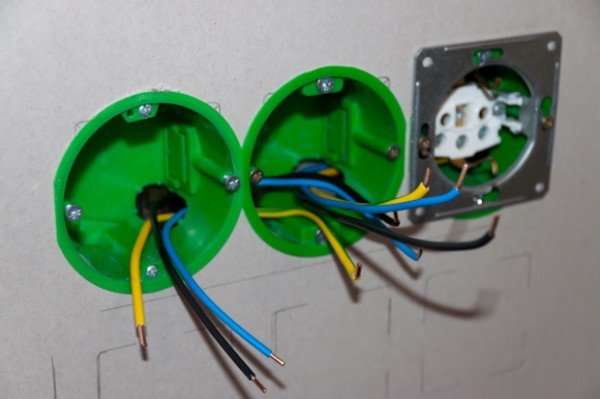
- The outlet is disassembled to the state where there isfree access to the terminals for fixing the electrical cable and further fixing the socket. The terminals are a metal connector with a screw, where the wire is inserted and reliably tightened.
- If a wall outlet is connected, the total insulation should be wound about half a centimeter inside the box.
- The cable wires are cleaned and placed in eachFrom the terminals that provide contact between the socket and the cable. It does not matter which of the wires to which contact (phase or zero) will be connected. If there is a ground in the socket, the corresponding wire is connected to the ground terminal. It is extremely important to observe the rule that none of the wires can not touch the other. Strip only the part of the wire that will be directly placed in the terminal. Usually it is 1 cm.
- After the wires are fixed in the terminals, the socket is fixed.
Ways to attach the sockets
Before connecting the outlet, theplace of its placement on the wall. In order to connect the socket both inside the wall and outside without additional efforts, you need to take care of the presence of approximately 20 cm of free wire on the wall surface.
If the wiring is external, then the back of the socketfor external fastening securely fixed to the wall using dowels or self-tapping screws depending on the material of which the wall is made. Then the process of connecting the cable to the contacts of the socket takes place, after which its front side is screwed to the rear part fixed to the wall.
Otherwise, the order of operations with the connectionsockets when the wiring is inside the wall. Here it is necessary to pierce a hole in the wall and install a padding in it. After the wires are tightened in the terminals, the rear part of the socket is placed in the jar and each of the metal legs is screwed against the wall. Unbend the paws until they stop, gradually, doing several turns to avoid skewing. The body itself is better to hold the second hand in a parallel to the floor position.
How to connect a grounded outlet
Often this type of outlet is not used.But there are cases when, for the sake of their own safety, they can not be dispensed with without them. For example, in the case of using an electric water heater located in the shower cubicle, the risk of getting an electric shock during showering increases significantly due to the excellent electrical conductivity of the water. It is necessary to place earthing devices near this place. At the same time, there should be no access to the ground for either people or animals.

For connection of sockets with groundingsupply a three-core cable. Usually the grounding cable is yellow. Red or brown indicates a phase, and blue indicates zero. If the appliance consumes a large amount of electricity, this connection must only be made directly from the panel device.
Connection types
There are two main ways to connect a socket: serial or loop and parallel or star.
The first method involves the alternate connection of all sockets, including grounding, supplying voltage to each subsequent outlet through the previous one.

The second way is to connect the sockets in parallel in the type of "star", when each socket is fed directly to the junction box and does not depend on the others.

The advantages of each method are obvious:The "cable" will economically expend the cable, but will not provide such a network with great endurance. That is, it is not recommended to connect high-power appliances to such a network. The unreliability of the entire circuit also applies to the absolute shortcoming, since the appearance of a problem in the contact of one of the outlets will affect the operation of all subsequent circuits.
"Star" will ensure the independent work of eachsockets with maximum load on the network and will increase the safety of the entire wiring, however, the cost of its installation will significantly exceed the first budget option. It should also be noted that the main cable that is passed to the junction box must have a larger wire cross section than the wires connected to it from the sockets.
Mounting height of sockets
The generally accepted rules establish the optimaldistance to accommodate outlets in the range of 30 to 80 cm from the floor. Of course, there are cases that do not allow to observe exactly these parameters. Then it is important to know that it is not recommended to install the outlet at a height below 15 cm from the slab and less than 10 cm before the start of the window. For our own safety, it is recommended to keep any electrical nodes away from the atmospheric effects in any of their manifestations.
Double socket
This type of outlet has two connectors forconnecting the plugs of electrical appliances, however, one connection to the network. To connect a double socket, as in the case of a single socket, it is not difficult, following the above instructions. It is important to understand that when two high-power devices are activated, all the load falls on one line. Since it is impossible to connect a double socket with the separation of the load from each device using the "star" method, it is not recommended to switch on powerful devices at the same time.
Two sockets
Since you connect two sockets that arenext to each other and having separate terminals for wiring connection, can be in parallel way, simultaneous switching of powerful electrical appliances will be safe for the power supply system. It is important to choose the right distance between the podzroetniki, so that the decorative strips of the sockets are freely placed.
Connection of three outlets
Connect three sockets, like two, and four,in a serial or parallel way, depending on the requirements for the electrical network. If the three outlets are connected in series, an important role in the work of the network will be played by contacts. In this regard, it is recommended to purchase sockets with quality components. Also, the connection feature of the "loop" is the need to maintain an unbroken grounding line. Therefore, you must connect the ground wire by tapping the wire, rather than breaking and connecting to the terminals. Thus, the reliability of the wire will not be achieved on the rosette mechanisms, but on its own connection, and a guarantee against line breaks will be ensured.
Connection of four outlets
Before connecting 4 socketsby a consistent method, you should carefully consider which devices are planned to be used with them. After all, if the maximum cable cross-section for which a standard socket is designed equals 2.5 mm with a rated current of up to 16A and can withstand the load of up to two powerful devices, the simultaneous connection of such devices to all four sockets will simply disable them. Thus, the use of four outlets with a "loop" connection method is allowed only with low-power devices. In this case, it is worth considering the connection to at least two independent power lines to these outlets, or to connect them to the power grid in parallel.
General rules for installing the socket block
Regardless of the number of outlets, the installation of their units has certain nuances and rules. To understand how to connect the socket block, consider the following instructions:
- The common distance between centerspodrozetnikov equals 72 mm with a depth of 42 mm. However, there are non-standard shapes of the faceplates of the outlets. Therefore, it is necessary to measure the distance between them before making the seats in the wall for the junkets.
- It is recommended to use the building level when applying markings to the wall before shredding the grooves for the juniper.
- The right terminal of the first outlet must be connected to the right terminal of the second outlet and so on.
- Due to the need for special reliability of contacts, they are recommended to be propaited.
Helpful Tips
There are a number of errors that are usually allowednewcomers. Having little experience, they do not know how to connect an electrical outlet in the best possible way and with the least effort. Let's consider some features of connection of sockets:
- At once it is worth paying attention to the material fromwhich is posted. If it is aluminum, then such a wire easily breaks at the folding points. Therefore, it is necessary to work with metal accurately - it will not withstand more than 3-4 bends. Then the connection process will have to start again, in addition, the crack can occur at the base of the wall, which makes it extremely difficult to reconnect the outlet.
- Aluminum wire has a much smallerconductivity than copper. Accordingly, when connecting the outlets, it is necessary to correctly calculate the distribution of the load on the mains in advance and, if necessary, replace the cable.
- When tightening the terminals, do not be zealous.Of course, the wires must be securely fixed, which is especially important with a large consumption of electricity. But they should not be clamped, as this will directly affect the quality of the connection of the sockets of the outlet to the wiring, which can lead to burning of the contacts, their overheating and malfunctions in the operation of the outlet.
- The quality of podrozetnikov should be given specialAttention. Over time, the contacts of the outlets can overheat, weaken or burn for various reasons. Today, many podrozetnikov are made of refractory material, and the cost is available to everyone. You should not save on your own safety and purchase materials of poor quality.
By observing these rules, you can easily followthe state of the electricity network, replace the outlets and switches as needed. But it is necessary to remember and observe all the safety rules for working with the electrical network and devices for your own safety.


